Create a Dataflow link
Important: A new link type 'Pivot and Aggregrate' is available in version 16.5 Update 7 and later, which allows for the Dataflow data to be transformed by pivoting and aggregation. This is described in the topic 'Pivot and Aggregate' Dataflow link.
- In the Hierarchy viewer, click the folder that will contain the linked projects.
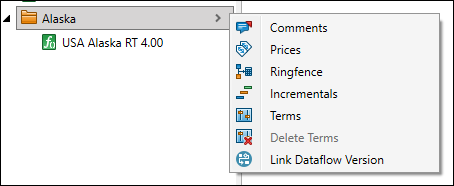
- Click the right arrow > and an action menu window will appear:
- Click Link Dataflow Version to open the Link Dataflow Version dialog:
- click the Manual Refresh button on the banner at the top of the hierarchy (see Change or break a Dataflow link), or
- click the Apply Link button in the Dataflow Integration tab on the ribbon for changes to be pushed.
- Click OK to close the Link Dataflow Version dialog.
- The Dataflow Integration tab will open in the main workspace panel:
- Scenario Mapping: The next step is to map the Dataflow scenario tags to the project scenarios required in the Economics projects. Add a new row by clicking Click here to add new item (underneath the 'Dataflow Scenario Tag' column heading). The Select Scenario Tag dialog will open.
- A new row will be added. An Economics copy of this scenario will automatically be created and linked to the specified Dataflow scenario tag.
- Once you have added the scenario(s) you want to use, click the Apply Link button in the Dataflow Integration tab on the ribbon to create the link. An amber-colored banner at the top of the hierarchy view will indicate that the projects are being synced.
- Once successfully linked, a small Dataflow icon will be displayed next to the linked project folder name. The banner at the top of the hierarchy will also indicate whether an Auto (with green background) or Manual (with gray background) link has been created.
- If an error occurs during a sync, the banner will turn red with status Sync Error. To open the Sync Log Viewer, click the right arrow > inside the banner to open a link actions menu, and click View Sync Log.
Note: The folder must contain a regime, and it must not contain any existing sub-folders or projects.
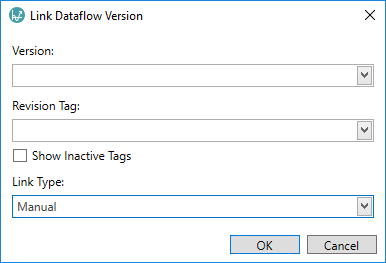
Specify the settings you want to use, as described in the following table.
Note: If a Dataflow link already exists, the Dataflow Integration panel will open instead. See Change or break a Dataflow link).
| Setting | Description |
|---|---|
| Version | Specifies the Dataflow version to link to. |
| Revision Tag | Specify a tag to determine which document revision will be loaded. Check Show inactive tags to make inactive tags available for selection. Select <Latest> to use the latest document revision. |
| Link Type |
Specifies whether changes made to Dataflow documents will automatically be pushed to Economics. Auto links will push changes automatically. For Manual links, to get the latest data you need to either: Note: A maximum of 10 Auto links are permitted per version. |
| Point Forward Date | Data in linked Dataflow documents can be truncated at a specified Point Forward Date to allow for point forward analysis. Check the Enable Point Forward Date box and enter a date. This option is only available in version 16.5 Update 7 and later. |
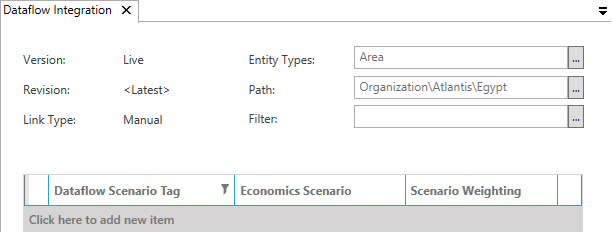
Projects will be created in Economics for the Dataflow Entity Types that are specified. The Path setting allows you to specify the section of the Dataflow version that will be used to create projects. Note that the selected Entity Types must be at least one hierarchy level below the location specified in Path.
For version 16.5 Update 17 and later: The list of entity types displayed in the Entity Types dialog will only contain entities for which the currrent user has been granted 'Read' permission.
Note that the variables that are synced to projects in Economics are determined by the Economics Configuration in the Dataflow template that is associated with each entity type. For more information, see Economics configuration. If a working interest variable has been defined as part of the Economics configuration, the working Interest information will be synced from the Dataflow documents to the Economics project. For more information, see Working interest shares.
The Filter option can be used to create projects only for Dataflow documents that meet some specific criteria based on variable values. Click the ellipsis button at the right-hand end to open a logic editor dialog.
For version 16.5 Update 24 and later: You can directly edit the text content of the Filter field, and copy existing Filter definitions as text strings, and paste the strings into the same or other Filter fields. The Cut, Copy and Paste actions can be accessed using mouse right-click or with the usual Control keys.
For version 16.5 Update 2 and later: When setting up a Filter the list of variable names can be searched by substring matching against text typed into the variable name box.
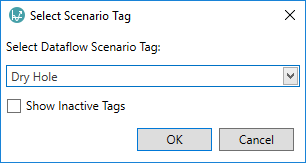
Select the scenario tag you want to use and click OK.
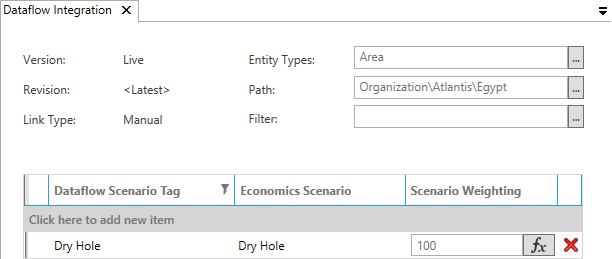
You can also customize the Scenario Weighting for the project(s), either by entering a value, or clicking the
 to open the
Edit Expression window, where you can build an expression to determine the applied weighting.
For more information, see Expression Editor.
For version 16.5 Update 14 and later: There are additional controls for adding or deleting scenario tags from the Scenario Mapping. Use the Add Mappings button on the ribbon to open a dialog to add multiple scenario tags in one step (the Scenario Weighting values can also be set); you can use the filter control in the column heading in the dialog to filter the available tags list. To delete multiple scenario tags in one step, select them in the table using their check boxes, then click the Delete Mappings button on the ribbon.


The linked project(s) are now available for use in Economics. A summary of your hierarchy links can be found on the Manage Hierarchies screen, accessed using the Manage Hierarchies button in the Home tab on the ribbon.
If you want to replace the regime of a linked project, select the regime and click the Replace Regime button
 in
the Home tab on the ribbon.
Note: Only values of unmapped variables can be edited within Economics. To change mapped values, you must edit the project in Dataflow.
⚓ Troubleshooting a Dataflow link
Linked projects can only be created in the Economics hierarchy if the following conditions are met:
- The corresponding document in Dataflow is one of the entity types specified in the Dataflow Integration tab.
- The corresponding document in Dataflow must have at least one of the Dataflow scenario tags specified in the Dataflow Integration tab, applied to one of its scenarios.
- If a specific revision tag has been applied in the Dataflow Integration tab (instead of the Latest revision), it must have been applied to one of the revisions in the corresponding Dataflow document.
- The relevant Dataflow template must have at least one variable mapping defined on the Input tab in the template's Economics Configuration.
- Any filtering criteria applied in the Dataflow Integration tab do not exclude the project.
Folder paths are only created in the Financials hierarchy when they contain at least one project.
If no projects are created due to any combination of the above reasons, then the status of the hierarchy sync banner will be red (Sync Error).
For version 16.5 Update 17 and later: When a configured Revision Tag is not referenced for any Dataflow document in a synchronization then a fatal Sync Error was triggered in earlier versions. This has been changed so that such events cause warnings only.
Use the Sync Log Viewer to check the errors in the sync log.
